Best Beauty & Style Books // AliceOlivia
 |
Gok Won Work Your Wardrobe A fun and sassy look at fashion from the Queen Gok himself. I recommend this for those of all ages; he discusses in depth different cuts of jeans, blazers to suit which body type etc, and really teaches how to dress for your body. While some of the outfits are not my style, this book is very useful, and reflects Gok's cheerful personality. Lauren Conrad Beauty A must have for all makeup lovers, or those who want to learn more about the art of makeup application. She also discusses other aspects such as skin care and hair care, and lists certain ingredients to avoid when shopping for products. This one is my makeup bible as I learnt a large portion of my makeup skills from here, and makes the perfect gift. Lauren Conrad Style Another fantastic book by Lauren, this one's about fashion. She discusses every thing from her key pieces, travelling essentials and go-to lists for any holiday occasion, work/ school appropriate outfits, and her makeup tips (though Lauren Conrad Beauty is far more in depth). I love Lauren's effortless, classic style, and this one makes for another fantastic gift to any fashion loving friend. #GIRLBOSS A quirky and insightful look at Sophia Amoruso, Nasty Gal founder and CEO, journey to becoming a enormously successful business woman in the fashion retail industry. She gives worthwhile tips and words of wisdom surrounding becoming your own "Girl Boss" in business. Alice xxx |
Showing posts with label best. Show all posts
Showing posts with label best. Show all posts
Tuesday, 24 March 2015
Best Beauty & Style Books // AliceOlivia
Saturday, 22 November 2014
Drugstore Foundation Rundown: My Favorites
Drugstore Foundation Rundown: My Favorites
Follow me on Bloglovin: http://www.bloglovin.com/blog/11555387
My Instagram: http://instagram.com/aliceoliviablog
Hi all, I hope you are having a fantastic week. Today's blog post is perfect for all you makeup newbies, or foundation addicts like me. Out of all makeup products, I find foundation the most daunting. When I hear the word "foundation", an image of a young girl plastered with a white, powdery mask appears. However foundation can be fantastic for creating an even base or adding a glow and life into dull skin. When you understand what shade suits you, whether you are cool or warm toned, and what sort of finish you like (matte, satin, dewy), foundations are fantastic.
While I do think it's worth while to invest some money into a higher end foundation on some occasions, there are plenty of fantastic foundations in the drugstore - you just need to know what your looking for. I will share with you my all time favorite drugstore foundations, and hopefully this gives you a little more knowledge and confidence to go out and pick your own.
 |
| For myself, I gravitate to satin/ dewy foundations since I have dryer patches (and oilier areas I powder), however if you are oily you might want to gravitate towards foundations with a matte finish. Try to look for foundations with a yellow undertone - a lot of drugstore foundations are ink toned, however yellow toned foundations usually look more natural as there is less of a contrast between your foundation and neck. I also tend to lean towards foundations with a light to medium coverage that is buildible, as I am younger and have reasonably okay skin, I prefer not to wear unnecessary coverage - however if you would like too, of course go ahead! Foundation is very personal, so make sure to try different finishes/coverage to see what you like most. |
 |
I have narrowed my favourite drugstore foundations down to four:
Rimmel Wake Me Up Foundation: This foundation is my all time favorite, as it gives a medium coverage and is looks so dewy and beautiful on the skin. I apply this with a buffing brush for a lighter coverage, however this foundation is buildable. If you are more oily skinned steer clear as there are a lot of reflecting particles, but if you are dryer this one is great.
Bourjois Healthy Mix Serum: This foundation has a light coverage and is more of a satin finish, so it suits most skin types. I love this one on "good skin days" - when I don't feel like a medium coverage and want something that feels light on the skin.
Rimmel Match Perfection Foundation: The shade is a bit iffy, however if you want a good drugstore foundation that is less dewy and reflective than the Rimmel Wake Me Up, this one is fantastic. This one is great if you are into more liquid foundations and a medium coverage.
Rimmel Matte BB Cream: This isn't essentially a foundation, however I did want to include this as it is a great BB cream for those of you with oilier skin. This isn't fully matte - however if you are looking for a BB cream with a medium coverage that doesn't give you that greasy, sunscreen look, this is a fantastic option.
|
 |
| If you are nervous and confused when it comes to drugstore foundations - you are not alone! I do hope that this helped you filter through the mass of foundations in the drugstore and has given you some good options to try out. Make sure to do some research before purchasing a foundation, and remember that everyone's skin and preference is different. Good luck with your foundation shopping! Alice xxx
Follow me on Bloglovin: http://www.bloglovin.com/blog/11555387
My Instagram: http://instagram.com/aliceoliviablog
|
Tuesday, 28 October 2014
Delicious Afghan Biscuits
Delicious Afghan Biscuits
Follow me on Bloglovin: http://www.bloglovin.com/blog/11555387
Follow me on Instagram: http://instagram.com/aliceoliviablog
Hi all! I hope you are having a fantastic week so far. Another baking post, as you seem to really enjoy them! Today I am sharing with you my favorite recipe for afghans - they are super simple, quick and delicious, and what's even better is they require only a handful of basic ingredients. This recipe is from the Edmond's cookbook, and I have been using it for years now because it has not once let me down.

 |
| Ingredients: 200 grams butter, softened 1/2 cup sugar 1 1/4 cup flour 1/4 cup cocoa 2 cups cornflakes of your choice chocolate icing (I made mine by mixing icing sugar with 2 table spoons of cocoa, a teaspoon of butter and boiling water) |
 |
| Preheat the oven to 180 degrees Celsius. Cream butter, sugar, and essence well until mixture turns pale and creamy. |
 |
| Add sifted flour and cocoa and mix well until combined. Don't worry if you feel the mixture is too crumbly - that's just how it is. |
 |
| Once the flour and cocoa are combined, add cornflakes and stir gently. Some people prefer to have the cornflakes more crushed up, however it is all personal preference. |
 |
| Roll into small balls (slightly smaller than a golf ball) and spread onto a backing sheet. You can make the cookies as large or small as you would like - the original recipe says it makes around 22 small cookies however I made mine a little larger (since the larger the cookie - the better, right?). Cook for 15-20 minutes, and allow to cool mostly on the tray before transferring to a cooling tray. Don't try and handle the cookies when they come straight out of the oven as they will be too soft and crumbly. |
 |
| I iced mine with a simple chocolate icing, however the world is your pickle. I decorated mine with spiders since Halloween is coming up and I felt they made them look a little more spooky. Now lastly, but most importantly, eat! |
Follow me on Bloglovin: http://www.bloglovin.com/blog/11555387
Follow me on Instagram: http://instagram.com/aliceoliviablog
Saturday, 17 May 2014
Delicious Apple Crumble Recipe
Delicious Apple Crumble Recipe
Follow me on Bloglovin: http://www.bloglovin.com/blog/11555387
Hi all! I hope you are having a fantastic week so far. Today's another baking post- my previous one was super popular (if you haven't seen that blog post, I teach you how to make delicious chocolate puddings - you can click HERE to see that), so I thought I'd share with you another one of my favorite desserts.
Apple crumble is a classic dessert, there's so many different recipes and toppings out there, but this is my favorite. This recipe is my mum's, it's honestly so delicious, and you can modify it to how you like (less spices, different fruit, etc...). It's super simple, and it's one of those meals with takes zero time to prepare, and you can just chuck it in the oven and that's that. Enjoy!

For the apple filling you will need:
5-6 apples (I use Granny Smith apples)
2 tbsp brown sugar
1/2 tsp cinnamon
extra butter for greasing
For crumble you will need:
1 cup flour
1/2 tsp cinnamon 1/2 tsp mixed spice 1 1/2 cups sugar 170 grams butter 1 cup rolled oats   |
| Grease your dish with a generous amount of butter. Preheat the over to 180 degrees Celsius |
 |
| Peel and chop apples into bite sized pieces, and add the brown sugar and cinnamon and stir. Set aside. |
 |
| In a food processor, blitz your butter, sugar, mixed spice, and cinnamon until it resembles a bread crumb texture. I had blitzed mine a little too long, so it started gathering into pieces, but in a way that's actually quite delicious! |
 |
| Remove from processor and put into a bowl, add oats and stir. |
 |
 |
| Pour apples into the greased dish, and then crumble on top. You can make the top of the crumble smooth if you like, however I like mine more rustic and "homely". Place in the oven and bake for 40-55 minutes - when the top is golden brown and the apples are soft when you push a skewer through them it's ready to take out of the oven. |
 |
And Tada! I hope you enjoyed this blog post - I really encourage you to try this recipe, it is so delicious and yummy, especially with ice cream or whipped cream. Let me know if you try it out, or your going to try it out, and make sure to leave any future blog requests in the comments. If you have a blog of you own, please let me know in the comments as well, as I'm always looking for new blogs to read. Love you all!
Alice xx
Follow me on Bloglovin: http://www.bloglovin.com/blog/11555387
|
Friday, 31 January 2014
Top nail polishes for spring summer
Top nail polishes for spring summer
Hi all! I hope you are all having a lovely week. Today's post is all about nails! I am a total nail polish junkie, I have way to many. I love painting my nails, it's so relaxing and therapeutic, and it is so much fun changing out my nail polishes for the different seasons.
For this post I am showing you my top six nail polishes for the spring summer, as some of us are just finishing enjoying the heat, while others will just be getting into it!
Follow me on bloglovin: http://www.bloglovin.com/blog/11555387/aliceolivia
 |
1 OPI Nail Lacquer in You're Such a BudaPest
I love lilac nails all year round, but I tend to gravitate towards the bubblegum purple hues for the summer. Lilac looks beautiful on the nails, and is a real staple. If you don't have a lilac nail polish already, I do really recommend purchasing one as they are perfect for all year round.
|
 |
2 OPI Nail Lacquer in Teenage Dream
This is the most beautiful glitter nail polish I have ever seen, and trust me, I have seen many! This nail polish from Katy Perry's collection is a creamy pink polish with silver and pink reflective glitter in it. This has to be my most used nail polish, I have repurchased it many times and will continue to do so.
|
 |
3 Revlon Colorstay Long Wear Nail Enamel in Coastal Surf
Revlon sells the best drugstore nail polishes by a long shot. I have so many nail polishes by Revlon, and all of their formulas are flawless. This color is a beautiful, true, bright blue. This is gorgeous on the toes especially, and I wear this polish frequently.
|
 |
4 Revlon Top Speed Fast Dry Nail Enamel in Guava
I have yet to find a nicer bright coral nail polish that beats this one. The colour and opacity of this varnish is truly unbeatable, and when I run out I will have to sprint to the store and get another that minute!
|
 |
5 Revitanail Fast Drying Nail Lacquer
I am unsure as to whether Revitanail is an international brand, but any sheer, pale nude pink (I don't know the color) is a must have for all year round. I like to call this my classy color.
|
 |
6 Mavala Nail Color in Hong Kong
Mavala polishes are truly beautiful, and this color is a gorgeous pale coral that is more orangery than pinky. It is reasonably sheer and has the most beautiful glossy sheen to it. I love wearing this when I don't feel like I want to rock a really bright fun color, but still want something a little different.
There you go! I hope you enjoyed this post, I absolutely loved making it. I will be doing a fall (or autumn) winter nail polishes post just like this one, so stay tuned. If you haven't followed me on bloglovin yet, here is the link: http://www.bloglovin.com/blog/11555387/aliceolivia
Love you all!
Alice xxx
|
Thursday, 23 January 2014
Best chocolate puddings ever!
Hi lovelies! Today's blog post is not a fashion or beauty post, but a cooking one! I love food, especially baking :)
As you guys get to know me a little more, you will soon discover that I am the world's biggest chocoholic, to the point where I have an unhealthy obsession with this life changing food. Food is a huge part of my life, just like makeup and fashion, so today I am here to share with you one of the world's greatest chocolate recipes, that will CHANGE YOUR LIFE.
This recipe is by Laura Calder - she calls it Moelleuz au Chocolat; others call it Chocolate Lava Cake, I just call it Chocolate Puddings. This recipe is truly fantastic and I feel like if I did not share this with you, I haven't lived to my fullest potential. This recipe can be cooked straight after making it, or you can refrigerate the batter in the ramekins, and cook them when you are ready to.
They are so easy and fast to make, but they look stunning and are very satisfying.

 |
Ingredients:
|
 |
| Preheat your oven to 400 degrees Fahrenheit (200 degrees Celsius) Grease 5 - 6 ramekins with butter (this recipe will make 5 larger puddings, or 6 smaller puddings). I usually skip this next step, but if you are wanting to remove the puddings from their molds when you serve them, line the bottom of each ramekin with baking paper. |
 |
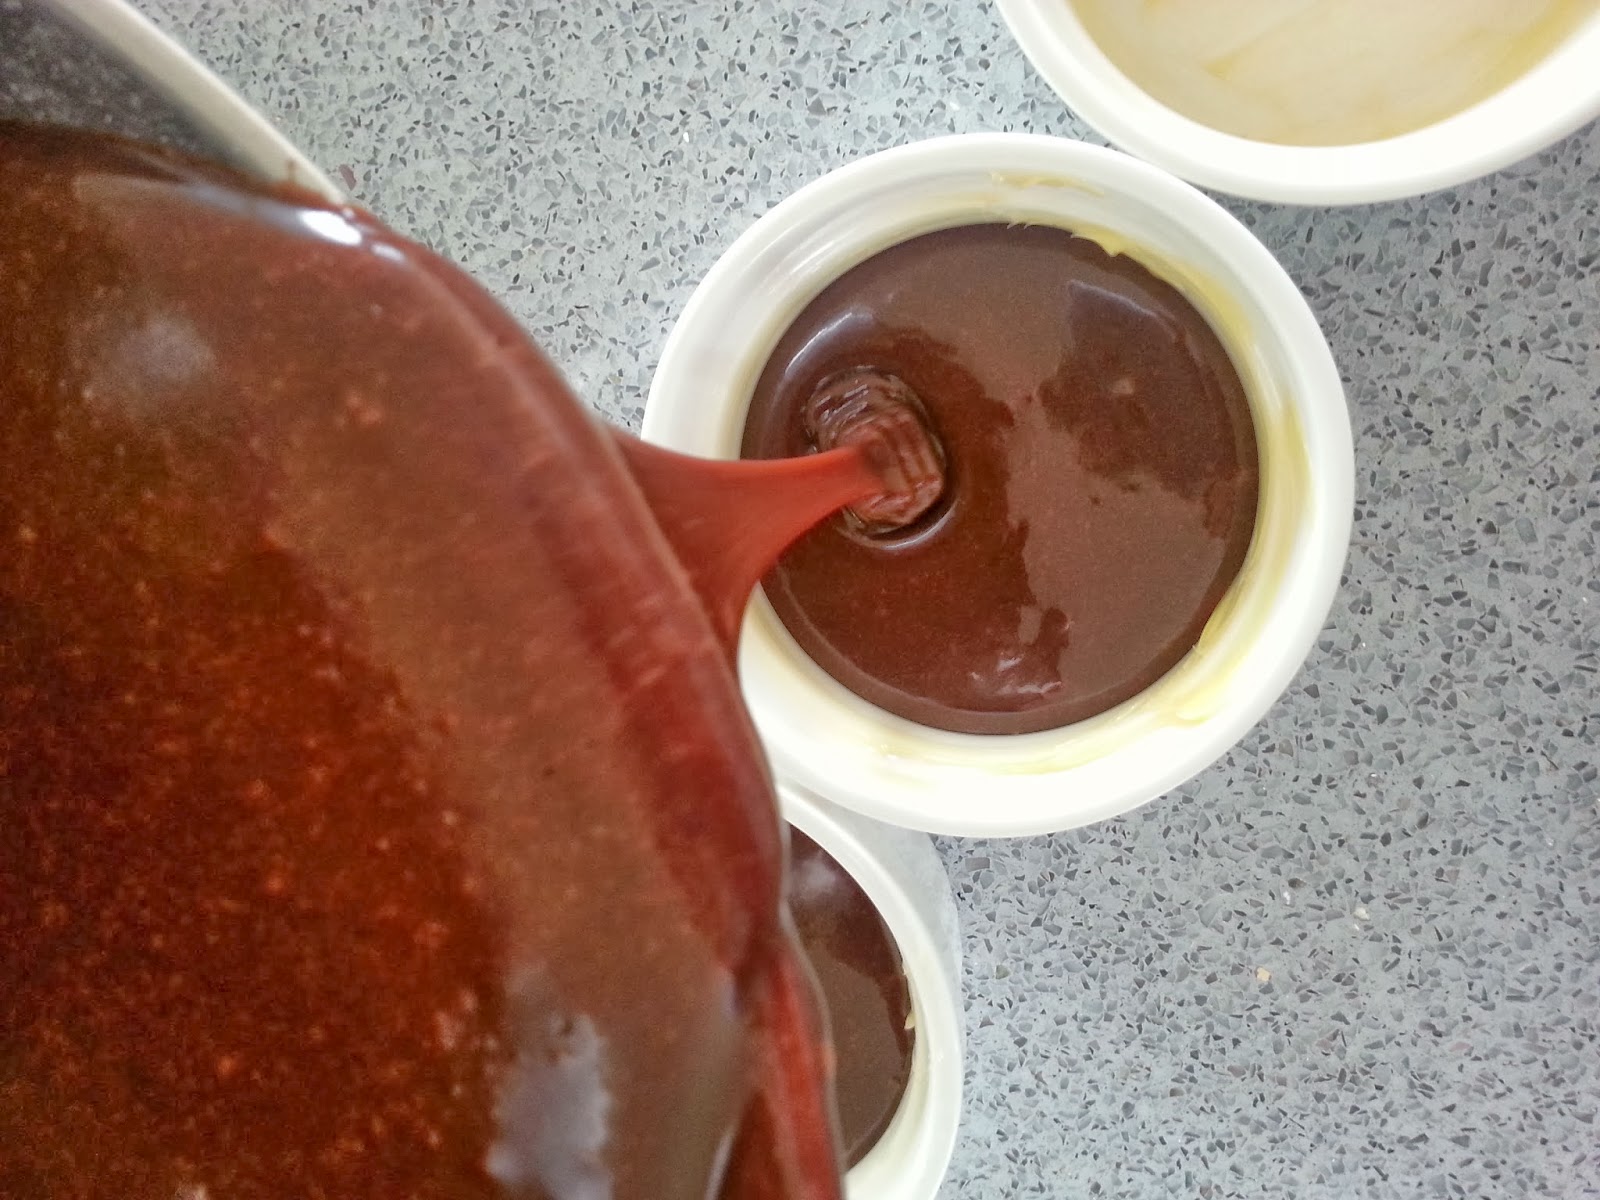
| In a double boiler, melt your chocolate and butter, stirring frequently. |
 |
| Once the chocolate and butter has completely melted, and looks extremely tempting to eat, remove from double boiler. |
 |
 |
| In a separate bowl, whisk eggs and sugar together to a thick pale ribbon like consistency. |
 |
After the sugar and egg is combined,whisk in the flour well. The mixture should look thick and pale.
|
 |
| Then, whisk in the chocolate mixture into the egg mixture , making sure to whisk constantly until combined. I recommend resting the bowl on a tea towel or cloth, as the bowl can slide around, and you have no free hands to hold it! |

 |
| Pour the combined mixture into the greased ramekins, leaving a small space at the top. |
 |
I then like to place mine on a tray, as it makes it easier to put into and pull out of the oven.
However, if you don't want to cook them right away, you can simply put some plastic wrap over the top of the tray, leave them in the fridge, and cook them later when you want to. Place in the oven and cook for 12-14 minutes, until the top is set. |

 |
| Yum! After baking them, you can remove your puddings from the ramekins onto the dish you want to serve them on, but I don't, since I feel its unnecessary, and it's just added difficulty. |
 |
| I like to have mine with whipped cream, but ice cream works well or they are still delicious just by themselves. |
 |
| The center is so gooey and delicious, I am literally salivating writing this! There you go! I hope you enjoyed this post, and I really do recommend trying this recipe out yourself, it is incredible! Make sure you leave a comment below telling me what you think, and leave any future blog post requests down below. If you have a blog of your own, let me know, so I can reply to all of you and check out those with a blog! If you haven't followed me on bloglovin yet, here is the link: http://www.bloglovin.com/blog/11555387/aliceolivia Love you all! Alice xxx |
Friday, 10 January 2014
Celebrity Street Style: The Best Of The Best
Hi all! Today is a visual blog post, where I show you some of the most fashionable celebrities in my opinion. Any one can look gorgeous in a Dior floor length gown, chosen by stylists, but when it comes to street style, celebrities are having to style themselves, and that's when you discover those true fashonistas! Here I have narrowed it down to 3 stylish celebrity babes, and hopefully you can gather some inspiration for outfits of your own! If you like this post, I can blog more about celebrity street style! Leave a comment below telling me your favorite fashionistas, and if you have a blog, leave it down below so i can return the favor. Don't forget to follow me on google+, and bloglovin: http://www.bloglovin.com/blog/11555387/aliceolivia
love you all!
RACHEL BILSON


Rachel's style is effortless and unpredictable (in a good way, that is). One day, she will be rocking a leather biker jacket and trendy scarf, the next a soft blouse and polished jeans. She is fearless, and I applaud her for that! Blazers, scarfs, sunnies and a killer pair of jeans are essential for replicating this effortless style.
LAUREN CONRAD


Lauren Conrad has killer style, and has a book to prove it! Her street style is casual and classic, and reasonably easy to recreate! To achieve her look gravitate towards neutral colors: look for boots, jeans, and white shirts, and over sized sweaters, however since these are staples you probably have many of these things already (and if you don't, go to the store now)!
BLAKE LIVELY


Blake Lively's style is very glamorous and... expensive (thus making it harder to recreate). She pays alot of attention to the texture of an outfit, and loves to layer. To steal Blake's style, go for leather jackets, layering pieces, and neutral toned scarfs.
love you all!
RACHEL BILSON
Rachel's style is effortless and unpredictable (in a good way, that is). One day, she will be rocking a leather biker jacket and trendy scarf, the next a soft blouse and polished jeans. She is fearless, and I applaud her for that! Blazers, scarfs, sunnies and a killer pair of jeans are essential for replicating this effortless style.
LAUREN CONRAD
Lauren Conrad has killer style, and has a book to prove it! Her street style is casual and classic, and reasonably easy to recreate! To achieve her look gravitate towards neutral colors: look for boots, jeans, and white shirts, and over sized sweaters, however since these are staples you probably have many of these things already (and if you don't, go to the store now)!
BLAKE LIVELY
Blake Lively's style is very glamorous and... expensive (thus making it harder to recreate). She pays alot of attention to the texture of an outfit, and loves to layer. To steal Blake's style, go for leather jackets, layering pieces, and neutral toned scarfs.
Subscribe to:
Posts (Atom)